Tuesday, 15 March 2016

HOW TO WASH YOUR MAKEUP BRUSHES


Hello all,
So my last post was all about the 411 with brushes, so I deemed it only necessary to talk about keeping those brushes clean and healthy. 
For me, washing brushes is essential but some may think it's a waste of time and they just can't be bothered! Which I totally understand but your brushes should be treated like children, and who wants their children to be dirty and carrying bacteria?! 
Washing your brushes at least once a fortnight, (a deep clean) especially brushes that you use for foundation as the bacteria will build up faster on them and transfer to your face when you use them, which can cause breakouts and all those things you don't want your skin like. However washing them also gets all the product off them so your blending can be perf and helps to maintain your brushes.

There are a few different ways you can wash your brushes, but my personal favourite is a good old deep clean. (the kind you do every couple of weeks) 


First of all the soap. I like to use baby shampoo because it's gentler than an ordinary shampoo and conditioner and it's cheaper! It makes your brushes smell amazing and feel so soft. It's also really cleansing and gets all the product out of your brushes. 


To really get deep into my brushes I use this Makeup revolution Pro Cleanse Brush Tool which makes it so much easier to really get your brushes clean because the texture means it gets in all parts of the bristles. (This ones only £4.99 and it's amazing) It just fits on your fingers and voila! Super easy to use. 


First things first - I put a good load of baby shampoo in a little bowl, as it stops me from getting too much on the brushes and gets just the right amount. Also it saves the product. I also fill a cup with water to dip the brushes into to dampen them. 

The hardest things in my opinion to wash are sponges. I first start off by wetting it like you usually would to use it and then dip it into the shampoo, making sure that it's fully coated.

Then squeeze the soap into the sponge until you can tell it's all in the sponge and the foundation will start to come out as you squeeze it. 

To get more out, I like to rub it on the back of the tool as its smooth and won't damage the surface of the sponge. This also gets the soap all in the sponge. Once the sponge surface looks clean and the water runs clear when you squeeze the sponge, run it under the water again to get all the soap out. 

The sponge may look slightly deformed but don't worry, it's just how the soap leaves it. It will go back to shape when it's dry. 

Brushes
For all brushes, the most important thing to remember is not to get water in the metal part of the brush, as shown in the picture. You don't want to get anything in the top or bottom of this part as thats where the glue is holding the bristles together and in shape, meaning if water gets in them, the glue will disintegrate and your brush will fall apart - so be very careful!

example using a real techniques buffing brush
When washing your brushes, you want to first of all damped the brush, by running it under lukewarm water and then dipping it into the soap. 


Then you want to swirl the brush on the cleansing tool so the soap bubbles up. You want to keep doing this and adding more soap until the water and bubbles run clear. A good way to check that your brush is fully clean is to get a little bit of soap on it, and if it bubbles up quickly then it's clean! 


You then want to squeeze the water out the brush to make it dry faster and fully ensure that all he soap is out. 


Finally you want to stand your brush at an angle so all the water drains off it. I like to put it near the window as well so it dries faster. You could also lye it off the edge of a counter like a lot of people do but i just prefer this way as I find it helps to keep the shape better. 

Another great way to wash your brushes is to use your hands! They're the best tools we were blessed with so why not use them?! Just do exactly the same thing as you would with a tool except swirl the brush around on your hand.
This is great if you don't have a tool or anything and it's super easy. It works just as good as a tool because your hand is naturally textured, and the gaps between your fingers are great for smaller brushes and across for a change of texture. However it is a bit harder to wash small detail brushes (e.g angled brow brushes, concealer and eyeliner brushes.)

Finally eyes. The top of the tool is especially good for eyes and detailed  brushes as the little bobbles are so close together it gets right in the hard to get to parts of the brushes. I especially love this for my little concealer brushes as it gets all the product off.
Also when washing smaller brushes, you want to make sure you get the sides as the product tends to stick there more.


For these smaller brushes, I think it's easier to do a few at a time. They all clean just as well it just saves time, soap and effort.

I hope this post was helpful and that these tips and tricks help you to keep your brushes clean and healthy! If you have any brush washing tips please let me know in the comments or any social media!

Thanks you for reading!
Fern :) 


Friday, 4 March 2016

GUIDE TO BASIC MAKEUP BRUSHES

Hello all,

Today I thought I'd talk about brushes. I'm a firm believe that if you've got a good set of brushes your makeup will always be good, no matter how bad the quality of the makeup. A decent set of brushes will mean that you get the most out of you products. When I first started playing with makeup (throwback to blue eyeshadow and magazine lipsticks) I had no idea what brushes even did and thought that the lovely sponge applicator that came with the bright eyeshadows was the height of makeup quality.
So after many hours spent on youtube and various beauty blogs, I now have a pretty good idea of what brushes should be staples in your set and what they're used for.

You'll have to excuse the cleanliness of my brushes, they need washing. I recommend washing your brushes once every week, especially foundation and concealer to get rid of all the gross bactirea on them!

right: flat top face brush (amazon) left: real techniques buffing brush

The first brushes are buffing/blending brushes. These are best used for blending foundation onto the skin. These are especially good compared to a flat foundation brush because they are fatter topped and have more surface area, meaning they will blend the product out more thoroughly and avoid any harsh lines. (and we don't want a foundation line yikes!)
These two are my favourite because they're synthetic and sooo soft and do the job so well.

real techniques, miracle complexion sponge
Next up is my absolute fave! (it's not actually a brush but lets roll with it) This is a blending sponge, not one of those cosmetic wedges or the cheap ones it's a proper blending sponge, like the super fancy beady blender. There's nothing better in my opinion to blend out your foundation and concealer with. It leaves a super flawless and weightless finish. These sponges work by wetting them and bouncing them onto the skin to blend your foundation in, super easy! And this specific one is super inexpensive (like £5.99 and they last for ages)  The flat edge is perfect for applying all over your face and the pointed end is perfect for getting under the eyes and in all those nooks and crannies! - 110% life for this 'brush'

Ted Baker powder brush
Next up is a powder brush. I use this everyday to set my foundation and concealer and to get a nice matte finish. This brush is perfect for this as it's so big and so little and easy to hold you can swipe it around your face easily and be done in like 5 seconds.

real techniques: duo fibre contuor brush
Another face brush is blush! I think synthetic brushes are best for blush because they stop it from looking patchy and blend easier. This one is especially good because it's the perfect size to fit right on your cheeks and cheekbones to blend it back, meaning you can't apply too much, so you don't look like you've got a sweat on. (unless you like that look then you do you boo.)

Eco tools: tapered blush brush
Bronzer, my fave. This brush is perfect for bronzing and contouring, because it's the perfect size as it's not too big or small. The hairs go into like a rounded point, so they're all different length meaning you can get right in the hollows of your cheekbones. I tend to go crazy with my contour as well, so this brush is amazing as it's a medium density so it will blend as you apply the product, so you wont have muddy streaks on your face! 
seventeen cheeks brush
Finally for face is highlight. I use this brush for highlight because it's so fluffy and can apply lots (y'all know I wanna be a disco ball) as well as blend it at the same time so it's not streaky, and applies the product beautifully. Also it's quite thin so it's like a fatter fan brush, so it does the same job but applies more, so perfect for us glow-lovin people!


Morphe G17, sigma E25, ted baker lid 
So onto eyes. I would use these 3 brushes for every eye look - from simple to hard core smokey these will blend your shadows out gorgeously.
The first is a big blending brush, so you can blend a colour seamlessly into your crease and blend out any dark shadows. This Morphe one is also so soft and has a rounded tapered style, so it fits perfects in the crease for an overall bleand, which is perfect for every eye shape. In my opinion, this is THE MOST IMPORTANT brush ever, because unblended eyeshadow is a crime!
Next is a more precise blending brush, for deepening the crease or applying a shade to the outer colour. This brush is so gorgeous and the rounded end makes it's blending super powers amazing.
Finally, the all over lid. This brush is fluffy so it wont apply too much shadow to look streaky, but enough to cover the lid evenly. Also this brush is lovely to use for highlight as it's not too big or small.


Last but not least, eyebrows. This brush is amazing as it's duel-ended with a brush and spoolie.  If you use a powder or gel type of product for your eyebrows, this brush is perfect! The brush side is angled, so you can sculpt your brows out sooo strong it's unreal. It's great for this as it's so soft and applies the perfect amount of product, so you have perfectly shaded brows!
On the other end is the spoolie! Super important for your brows as you want them to be brushed out, and not this can also blend some of the product!

Overall these brushes manage to get me through every makeup look ever (or there abouts) Some of these brushes are high end, but good brushes mean good face days. However there are some amazing drugstore brushes such as real-techniques, which are affordable and work so well!
I hope you enjoyed this post and it helped you in some way, shape or form! Let me know on my instagram!

Thanks again!
Fern :) 


Sunday, 28 February 2016

FEBRUARY FAVES

Hello all,

So, it's been such a busy month for me (as you can tell by the lack of posts) as I've been doing a course, and I'm officially now a qualified level 1 swimming teacher! which is super exciting and I'm really excited to use my new skills! I haven't got that many new things this month but the makeup products that I have purchased are amazing! Also been loving some random stuff as well so letf be getting straight into it! I also got a new photo-taking-area! It's this cupboard top that I got from IKEA with a glass surface on, and look how cute my lil vase-lamp thing is!

L'oreal - Infallible sculpt - contour light/medium

So L'oreal have just come out with all these new 'sculpt' products ranging from foundation to blush to brows etc and I saw Emily Canham (on youtube) use this product and I was like holy jesus I need it! It's a cream to powder formula so the bronzer is so easy to blend and look amazing. There's literally nothing else like this is the drugstore so I think it's amazing! Honestly, I don't really like the highlight shade because it took all my foundation underneath off, but the contour colour is amazing!
This was on offer in boots for £6.99 rather than £9.99 which i think is so good, so you should deffo go get one of these if you love a gorgeous contour! Get it here

KIKO EYE PENCIL

I have been looking for an affordable tan coloured eyeliner for so long because even the drugstore ones are quite expensive! (£4 for an eyeliner is expensive in my books) But this one from KIKO was in the sale for 70% off, so it ended up being like £2 which I think is really good! It's also so pigmented and lasts on the waterline all day!

KIKO SMOOTH TEMPTATION LIP STICK - 01 nude

Again, I was in Kiko and in the sale I found this gorgeous lipstick! (was like £2.50) Kiko lipsticks are such good quality and go on so smoothly, also the colour range is amazing! I also love the packaging as its so handy to just put in your bag or pocket! The colour is so lovely and I deffo wanna buy some more of these! Get it here!

VASELINE - SUGAR COATED EDITION 

As you know, I love vaseline for moisturising my lips! And because of the sudden weather change (it's so cold it's ridiculous) my lips have been hella dry and chapped it's gross! So this limited edition of vaseline has little bits of sugar in it so it tastes amazing! It has a light pink tone to it but not enough to add any colour (like the rosy one) just makes them look really plump and nice! This beauty is only £2.99 at boots as well!
Get it here!!
Victoria's secret - sheer love body spray 

I got this for christmas and have only just started using it properly (gone past the point of having effort to perfume on!) and it's so easy to just spray and coat yourself in! I also love the packaging! The smell of this one is also very light, so you don't have a really strong smell stuck to you all day, but something lighter and very feminine.

Heroes reborn
So I couldn't get a picture of this one, as it's on TV at the moment, but if you read my last faves then you'll know I'm obsessed with heroes! So this is the follow on series that takes place 10 years after the final episode. AND OMG IT'S SO GOOD! If you love the original Heroes you need to watch this! It's on 5STAR on Tuesday's at 9pm! It has some of the original cast in and some new ones as well, so deffo get watching!

Glee volume 1 CD

So I have no pic of this CD because it was in the car when I was taking the pics and the car wasn't at home so I couldn't get it! But this CD is so good. Obviously if you love glee you need it, but the talent is so good! I recommend glee so much it's one of the best series ever, and also all the CD's are amazing, but the first is my fave as there's so many signature songs on it and you can sing along to them so easily! (a key aspect in a CD in my opinion!) Get it here!


Thankyou so much for reading I hope you enjoyed! Let me know your faves from this month! Please follow my blog and my instagram! @Foreverfern_

Thanks again!
Fern :)


Friday, 5 February 2016

JANUARY FAVES 2016

Hello all,

It's that time of month again! (Geez not that time, ew) Monthly faves time! This month I have loads of favourites as I didn't do one in December and I have acquired a lot more makeup bits and other things from christmas which I have literally been obsessed with for the last couple of months.
Last month was a weird month for me as I had a few issues to overcome, however this month should hopefully be better as I have a lot of exciting things to look forward to!
Also I apologise if some of the pictures aren't the greatest quality, my camera was playing up big time and the quality seems to have decreased when uploading them!

Benefit - Dallas
OMG! So I bought this bronzer with a voucher I got for christmas (£23.50 from Debenhams) and I'm literally obsessed. I decided to get this blushy bronzer over the oh-so famous 'hoola' because it's a much more flattering and suitable shade for my skin tone (however I still want to try hoola!) In addition, the packaging is amazing and i kid you not the powder is so pigmented and the little brush it comes with is so cute and makes a really nice sharp contour!
I also love this product because it's so versatile. For example I can use it as a bronzer, or it makes a really beautiful eyeshadow for in the crease! An overall amazing product and one of my top must-haves this month!


Pan Flute necklace
If you know me, then you know I'm obsessed with Once upon a time, and also Peter pan is one of my all time favourite disney characters (because who doesn't love a boy in tights) So for christmas I was lucky enough to receive this lovely necklace. (after a lot of hinting to bae I must add)
I have been wearing this none stop! The charm is the perfect size as it's not too big or small so it sits perfectly on whatever you've got on. Also i really like the black string, as it doesn't nip your skin like a chain would.

HEROES
OMG I ACTUALLY CANNOT! I am obsessed. no more words needed.
This is one of the best series I have ever watched. To say that it's 10 years old,  the quality of the acting and the special effects are amazing! Not to mention it's obsessive, the story line is so addictive and throughout the episodes you're pulled in to see what happens to each character, as you learn more about what they can do. Also I've become emotionally attached to all the characters, making it even more obsessive!
Believe it or not, the entire series only cost me £19.99 from HMV, which is ridiculously good as it costs around £7 for each season! (Also the box makes me happy because I can tell who's gonna be a main character and who is gonna be gone)


Urban Decay Naked 2 
With my christmas money and vouchers I finally purchased one of Urban Decay's naked pallets! (2 to be exact) and I'm so obsessed with it! It's so pigmented and the colours are beautiful! I did a whole post dedicated to this beauty, check it out here!

Nivea men - post shave balm
(Omg so sorry for the awful quality of this photo it kills me) This product is so highly raved about throughout the makeup industry on youtube and stuff, as started off by The lovely Nikkitutorials (and if Nikki says it's amazing then it must be) So i had to check it out and I was not disappointed! The balm becomes tacky when you rub it into your skin as it contains glycerin, meaning it will keep hold of your makeup all day!
I've used this literally everyday since I bought it, and it's super affordable as well, so it's perfect!
(if you do purchase, try and get it when it's on offer, as it's like £5.50 otherwise and the offers often make it half price)

Becca - Jaclyn Hill 'Champagne pop!' 
HOLY GLOWING GOODNESS! This highlight is literally everyhtiiiinng! If you even makeup you will know what this product is, because queen jaclyn and Becca cosmetics have done every wanna be disco ball proud! The colour is gorgeous, it's a beautiful golden champagne colour and it's soooo pigmented and adds the most amazing glow! And I don't even mind that I paid over £30 for this product, because you can just tell from holding the beautiful packaging (which looks like a UFO) that it's of a very high standard.

Ted baker - Blush and Highlight 
For Christmas I received the gorgeous ted baker beauty box thing that they sell at boots, and it contained so many gorgeous products with such amazing packaging. Recently I've been obsessed with blush, and these two are my current faves! the darker one is perfect for this time of year as it's so natural whereas the lighter one is perfect for a really subtle blushed look.
I also love the highlight in this pallet because it's a really pretty natural pink champagne, and it's so glowy and natural.
Also the packaging is a gorgeous rose-gold and the mirror bit is so cool as it twist around (it reminds me of a flip phone #throwback) and it's such a big mirror it's perfect for travel.

MAC - Matte Bronzer
I bought this bronzer after christmas in 2014, and I've hardly used it as it's not very pigmented, but this past month I've come to love it again! It's the perfect cool tone bronze for contouring and it's really build-able, because it's not crazy pigmented. So what I thought was a bad thing is actually a really good bronzer!

Colouring books
A massive crazy at the moment are adult colouring books, and I'm one of those people following the craze. For christmas I received a load of these amazing colouring books. They are sooo relaxing and I actually find them so fun! My favourite out of the picture is the New York one, as the pictures are so pretty and really easy to colour, also I'm obsessed with New York, so it's all the better!

Pro cosmetics - curve brush
Yet again, I got on the wagon with this crazy, however I did it much cheaper. This brush is actually amazing tho, it glides the foundation or concealer on so smoothly and keeps such a high coverage it's amazing. The going rate for these brushes is around £40, however this one was only dead cheap off ebay! (as told by my sister who got me it for christmas)

Ted Baker powder brush
This lovely rose gold brush was again from the ted baker beauty box from boots. I love using this for powder, as it's so big and gets a good amount of powder all over the face fast, and without looking cakey. I also love it because it's a cute little kabuki, so it's easy to store and hold.

So that's all of my favourites for the month on January! I hope you enjoyed this post, let me know what your Faves from last month were on my new instagram account! (@ForeverFern_) Please give it a follow because I have like 9 followers! I post pictures of makeup and anything I love or just anything really! Please give it a follow!

Thanks again!
Fern :) 


Thursday, 14 January 2016

BEST LIP CARE EVER

Hello all,

It's that time of year again where the weather gets lower and the chances of my lips getting chapped are higher, meaning that your lips are in need of some love and tlc!
I tend to get chapped lips all year round so I have quite a collection of lip balms, and have found the ones that are bet for different occasions!  (it's unhealthy I have a legit obsession!)
Here are just a few of my collection
Whether or not you have chapped lips, I think it's important to always use lip balm to keep your lips soft and healthy and to prevent getting chapped lips in the future! 
I always have at least 3 types of lip care on me, one in the makeupbag, one in the pocket and another rolling around the bottom of my bag, so it's deffo a staple in my everyday life! 


Vaseline - the first of the collection. I have quite a few vaselines, because they're so small and easy to store! (as well as being bought those big tins of them for the last 3 Christmases)
Vaseline is great for when you've gone past the point of no return, when your lips are cracked and chapped and causing you pain and annoyance! Due to its very greasy and oily formula, it makes it perfect for a deep moisturise and can have your lips saved within a few days!
This product is also perfect because it comes in so many different types, for example the yellow one is especially for when you're in the sun, so it has SPF protection as well as lip therapy!

I personally love this product, my favourite being either the Aloe Vera one (green) or coconut (brown but not on the pic lol) because it really does nourish and moisturise your lips and makes them super soft and luscious! I keep these 3 vaselines on my makeup desk at all times, and use them everyday!


(left) medicated tangerine, (right) sweet mint, (top) coconut milk
EOS - A couple of years ago there was a MASSIVE hype about these cute little lip pods because Miley Cyrus used them in one  of her videos, so I obviously got on that bandwagon and got my hands on some!
Now I personally love these cuties because just look at them! They're so cute and pretty! (And they look super cute on my desk) As well as tasting AMAZING as they come in sooo many different flavours! Also they don't apply any colour, which I like, and they're so easy to apply without being too slippery or greasy, making them perfect for use under lipsticks.

As for the lip care part of them, I wouldn't say they're the best, because they can be very drying, about 15 minutes after applying them. Which is why a lot of people were disappointed with them when the hype first began.

My personal favourite for lip care, is the tangerine one (bottom left) because it contains a medical thing, that helps your lips. At first it does taste like medicine, however after a while you get used to it and it tastes amazing! This is also the best for getting rid of dry skin and fixing your lips, due to the medicine in it.
Taste wise, my favourite is the sweet mint (bottom right) because it's so minty and makes your lips zing and smells amazing.


Nivea- In my opinion, the best stick there is! I personally love these because of the creamy and smooth consistence and they glide on amazingly, making them perfect for everyday use. In addition to this they provide a really deep moisturise for your lips and make them really soft!

They come in so many different flavours, and some have tints to them so they add a really subtle colour. My favourites are the normal one, (the blue) and the fruity shine - peach (left) because the original is so nourishing and helps your lips so much, likewise so does the peach but it tastes and smells amazing!
Another great one is the hydro care (it's light blue) as it's waterproof and lasts so long!

peach, Dr rescue, pink punch
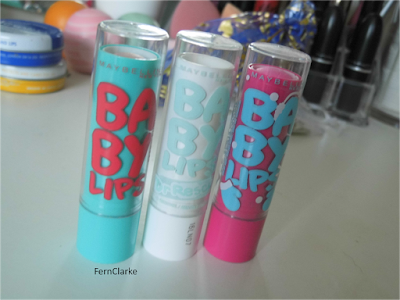
Baby lips - Finally, my not-so-secret obsession. Maybelline baby lips are AMAZING and a lot like the Nivea. (but the packaging is prettier)
They're so hydrating and amazing for everyday use, as they are such a good size you can keep them everywhere (I must have at least 3 dotted around the house and the rest on my desk) and the lids are really secure (always a good aspect in a lip balm)
In addition some of them are tinted which makes them even better because they colour and save your lips! I also love these cuties so much because the packaging is amazing and the flavours are the most wide spread I've ever seen!

My personal favourite is just the ordinary, not tinted, Dr rescue (middle) because it's nice and thick so it hydrates your lips amazingly and makes then really smooth and lush!
My fave tinted one is the pink punch (left) because the colour is really subtle but also soooo pretty and looks amazing to wear everyday!

One of the first posts I ever did was all about my baby lips so if you want to see my collection (it's grown a bit since then so I can do an updated one if you like??) check it out here !


Thats it for my top lip care, I honestly have at least one of these with me at all times, and I have them dotted all around the place and in ever bag I own!
I think it's very important to keep your lips hydrated and cared for as they can be sooo painful and annoying when they're chapped!

Let me know what your fave lip care is!

Thanks for reading I hope you enjoyed!
Fern :)


Sunday, 10 January 2016

NAKED 2 PALLET


Hello all,

So as of about 2 weeks ago, I am the proud owner of my very first Naked pallet, Naked2 to be precise. I literally cannot get over how beautiful this pallet is! Obviously I knew how great it was from the many reviews and videos there on the internet but i never thought it would be this amazing!
I chose the Naked2 above the others because I feel it has the most wearable colours for me and my skin tone and in my opinion, some of the prettiest! (like omg look at 'ydk' it's beautiful)


First of all, the packaging. I'm a bit of a weirdo and like to keep my pallets in the boxes they come in (is that weird, I'm not sure) to keep them protected and also I love packaging! So i have to keep it all!

I especially love the box because it's very sturdy and strong, so the pallet is kept safe. It's also really pretty and I really like how it has the colours on, so you can see what you're getting even without opening the box!
The packaging of the actual pallet is good as well because it's metal so it's very strong, however I do prefer the packaging for the original Naked pallet, just because it's a bit more exciting! (it's all fury and soft) But this packaging is strong and the colour is so pretty! i just love it!


So when you open the pallet this is what you see! The mirror is sooo nice because of the shape. It's rectangular which makes it perfect for doing eye makeup!
As you can see the colours are AMAZING! There's a really nice variety of cool tones and warmer tones, which again makes it perfect for every eye colour or skin tone.
My favourite colour in the pallet would have to be 'Bootycall' and 'ydk' just because I love purples and highlight colours!
The only thing I would say kind of annoys me about this pallet is that there's only 3 matte shades, and I absolutely loooooove mattes and it's always good to have at least 2 matte transition shades in a pallet but this only has the one which is 'tease'
Apart from that this pallet is absolute perfection!


It also comes with this super cute brush, which is amazing because the pallet is quite expensive (£38) so it's good you don't have to pay to get the brushes you need. Also the brush is really nice, it's synthetic which means it packs a lot of colour on and is SO easy to clean! The flat shader end (left) is amazing for putting colour all over the lid, however I do think the blending end could be a little more fluffy! But it still does the job of blending!
I really like using the fluffy end to highlight the brow bone because it's fluffy but still quite dense, so it applies the colour really nicely.

super big picture so you can see! 
I swatched the colours so you can see how truly pigmented they are! Some of the lighter shades are hard to see on my vampire skin but you can still see them which shows how pigmented they are!
I used my finger to apply these to my arm, like I would to my eye as I feel it's the best way to get the most product and pigment onto your lids!

Colours from left to right,
foxy, half baked, booty call, chopper, tease, snakebite,suspect, pistol, verve, ydk, busted, blackout. 

As you can see the colours are crazy pigmented and the shimmery colours are super shimmery! like verve and ydk are insane!!!

My two favourite looks that I've made from this pallet are super easy to do and look so pretty!

Look 1
1. start off my priming the eye lid up to the brow-bone.
2. Apply 'foxy' all over the lid, crease and brow-bone to set the primer and to make blending easier.
3. Blend 'tease' into the crease.
4. Apply 'suspect' all over the lid and blend out the edges.
5. Apply 'pistol' into the outer V / third of the lid and blend into the outer crease.
6. Blend 'pistol' and 'tease' along the lower lash line.
7. Apply 'booty call' into the inner corner of the eye and brow-bone and blend so there are no hard lines!
8. (optional) Finally apply eyeliner or 'blackout' along the top lash line to define the eye further!

Look 2
1. start off my priming the eye lid up to the brow-bone.
2. Apply 'foxy' all over the lid, crease and brow-bone to set the primer and to make blending easier.
3. Blend 'tease' into the crease.
4. Apply 'ydk' all over the lid and blend out the edges.
5. Apply 'busted' into the outer third and lightly blend into the outer crease.
6. Blend 'busted' onto the outer third of the lower lash line and 'ydk' on the rest but avoid the inner corner.
7. Apply 'booty call' into the inner corner of the eye and brow-bone and blend so there are no hard lines!
8. (optional) Finally apply eyeliner or 'blackout' along the top lash line to define the eye further and even wing it out if you want more drama!

My sister took this and wanted me to share,
IT'S SO COOL AND SYMMETRICAL!!
Overall, I think this pallet is amazing and so wearable.
I think this pallet would be amazing with people who are just starting with makeup and want a good pallet to use, because the colours are so bendable and so easy to work with, as well as it coming with a super good brush!

Thankyou so much for reading, I hope you enjoyed!
Let me know if you love this pallet or what your go-to pallet is!


Thanks again!
Fern :)